-1.png?width=718&height=394&name=Barrister365_Navy_Trans%20(002)-1.png)
How to login to Barrister 365
To log into barrister 365, open your web browser and go to the website app.barrister365.ie
You can also go the the Barrister 365 website at www.barrister365.ie and click Login at the top right corner.

When the login screen appears, you can login with your Law Library or Microsoft 365 email account and password.

When you login for the first time, you'll need to grant the app permission to connect with your account. Rest assured, neither Barrister 365 nor its staff can access your data, as it remains secure within your Law Library account.
The app requires these permissions to show your emails, manage calendar events, and save files to your OneDrive.
How to fill in the welcome screen
- Name
- Phone Number
- Address
- Language Proficiencies
- You can also upload your signature that will be used on your Bill of Cost, Section 150’s and VAT invoices

Next, fill in your registration details and VAT number.


How to navigate the dashboard
The dashboard will feel a bit bleak when you first sign in. However, this will soon fill up as you start using the app.
For this tutorial, we have prefilled data into the app.
The dashboard is made up of three sections:
- The Sidebar
- The top bar
- The main dashboard work area
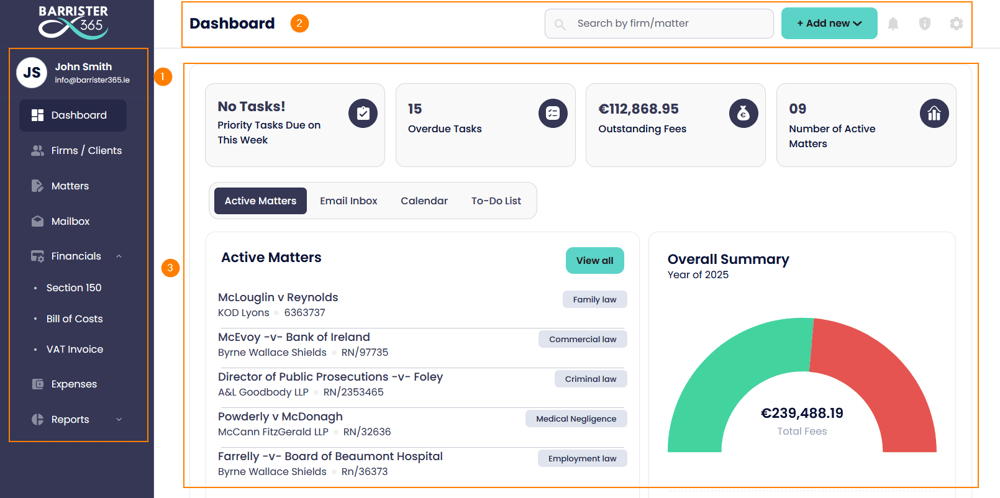
The sidebar is for navigating the modules within Barrister 365. You have your Firms and Clients, Matters, Mailbox, financials and reports.
On the top bar, you have the search box for searching any content within Barrister 365 such as matters, firms, billing etc.
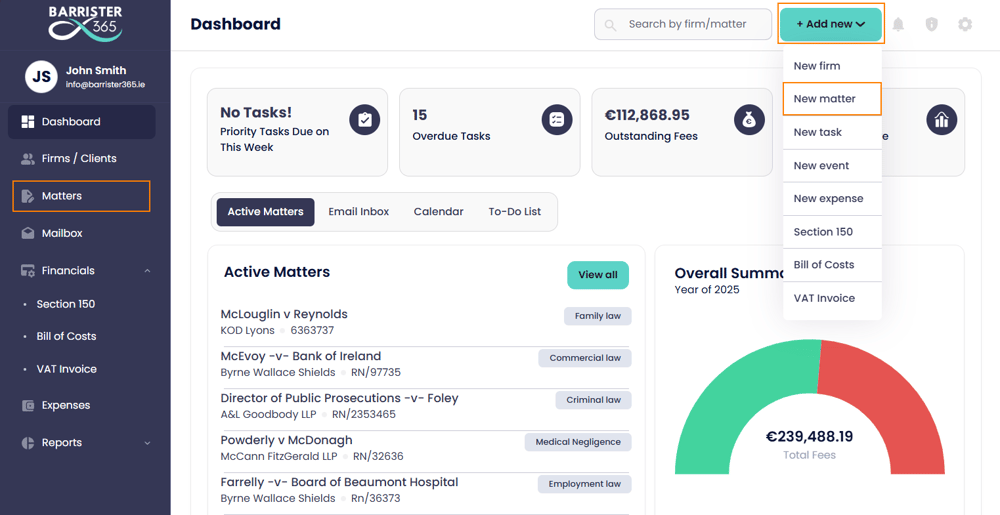
Next to that you have the Add New button were you can quickly create firms, matters, tasks, Bill of Costs, VAT invoices, etc.
The notifications button is were you will receive alerts from the app.
The information icon is were you can view the privacy policy, terms and conditions and contact us for support or help.
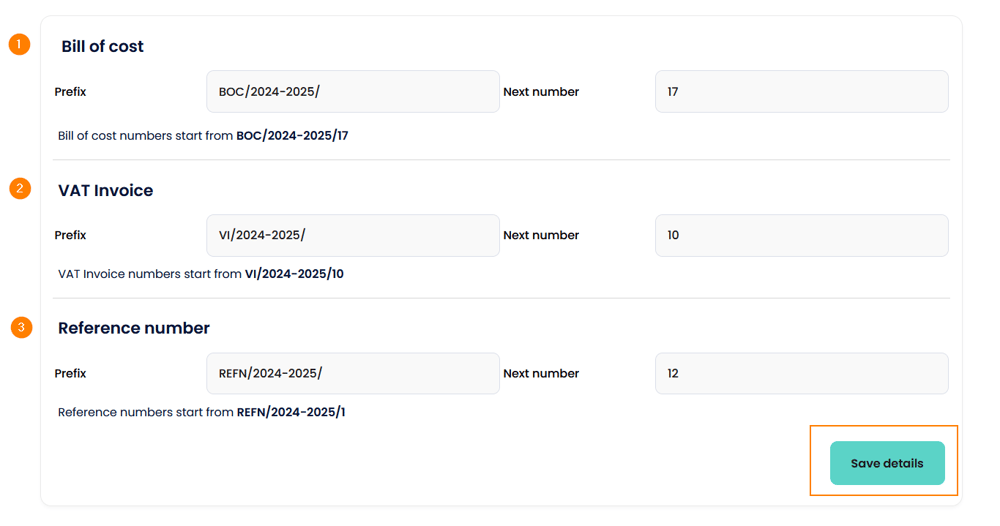
The last icon is for accessing the settings, here you need to edit your Preferences. To do so, select Preferences and fill in the starting prefix's you’d like to use for your:
- Bill of Costs
- VAT Invoices
- Reference numbers
- Once completed, press Save Details.
From the settings icon, you can also Manage and edit your Profile information you inputted on the welcome screen.
If you want to log out of the app, select the settings icon and click Logout.

On the main dashboard work area, information cards are displayed across the top. These cards show your Priority Tasks, Overdue Tasks, Outstanding Fees and your Number of active matters.
Below that, you have the four key areas you work from. Active Matters, Email Inbox, Calendar and To Do list.
Matters that you are currently working on are displayed under Active Matters. you can select the title to view the matter or select View All to go to your list of Matters.

Email Inbox provides a quick view of your incoming and outgoing emails. Here you will be able to copy emails and attachments to specific matters.
The Calendar tab displays your monthly activities. You can quickly add a new event or meeting by clicking on the date.
The To Do list is were you can view, add, filter and complete your tasks. We will show this in more detail in the "Manage your matters" section.
On the right you have a quick overview summary of your billed and outstanding fees.
Below that you can see the number if matters instructed by each firm. This is helpful to quickly see who your best instructing firms are.
How to add firms
You can add a firm in two ways, the quickest way is to click Add New on the top toolbar and select New Firm. You can also click Firms / Clients on the left sidebar and then click Add New.
Next, fill in the details about the firm, their name, type, phone number, email, dx information and address.
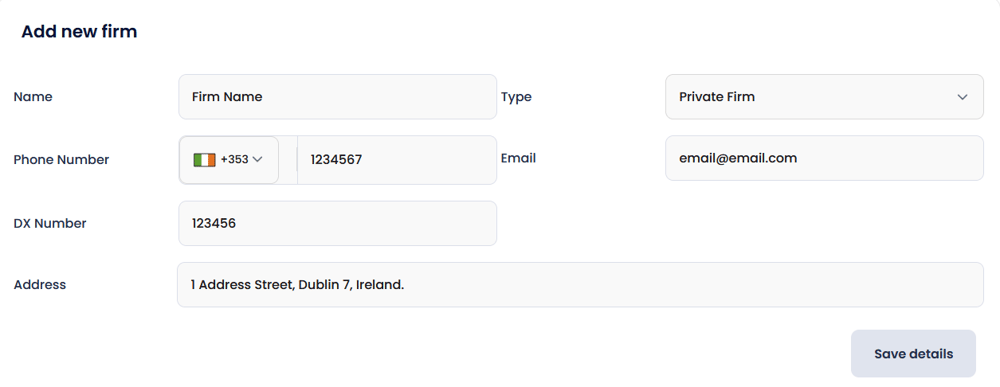
Then select Save details.
To add additional firms, complete the above steps again for each firm.
How to manage your firms
Once the firm has been added, you will be brought to the firm details page.
Here you will see a view of the details you just inputted regarding the firm and the six component relating to the firm including:
Matters instructed from this firm.
Section 150’s issued to the firm.
Bill of costs will display the total bill of costs, total income, total outstanding and total write-offs relating to this firm. You can also filter bill of costs by matter and add a new bill of costs from within this tab.
VAT Invoice will display a list of VAT invoices issued to this firm.
Income Reports, you can view and generate income reports relating to just this firm.
Contacts, you can add the contact information and notes for each if your contacts within the firm.

To view a list of your firms, your can click the Firms / Clients button on the left sidebar. In here you can also edit and delete a firm by selecting the three dots to the right of the firm details.
How to create a matter
You can add a new matter in multiple ways, the quickest way is to click Add New on the top toolbar and select New Matter. You can also click Matters on the left sidebar and then click Add New.
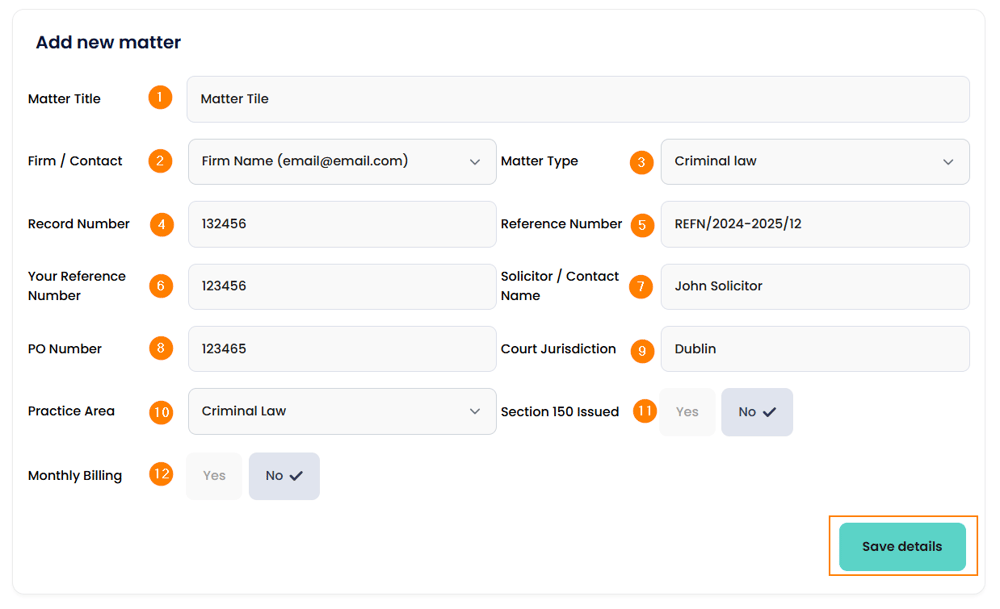
Next, fill in the details about the matter:
- Title
- Firm
- Type
- Record Number
- Reference Number
- Your Reference Number
- Solicitor / Contact Name
- PO Number
- Court Jurisdiction
- Practice Area
- Section 150 Issued - Yes or No
- Monthly Billing - Yes or No
Press Save Details to continue to the matters list.
That's it, you've created a new matter. In the next guide we will work on the matter.
How to work on a matter
** Please note, one of the main features of Barrister 365, is that when you create a new matter and upload documents, the folder structure and files are automatically created within your OneDrive account. This is extremely important as in the event that you cannot access the app or decide to no longer use the app, your data stays with you. Barrister 365 has no access to your data.
The main purpose of using matters in Barrister 365 is to track all your work done on each case and record whether each task is billable or not.
Why track non billable items? When discussing payment disputes with barristers over the years, a common theme we hear is "I did a lot of work on this matter that wasn't billed". By keeping a record of non-billable tasks, you can provide evidence if the LSRA raises a payment dispute.
Lets get started using the matters module.
After creating a new matter you will be brought to the matters list. Click on the matter you want to work on.
You will then see the Matter Details page. You will see the various areas of the matter were you can upload documents, drafts, reports, attach emails, work on tasks, view calendar events and create bill of costs.
The main areas within the matter are:
- Overview
- e-Briefs
- Drafts
- Emails
- Reports
- Notes
- To-Do's
- Calendar
- Financials
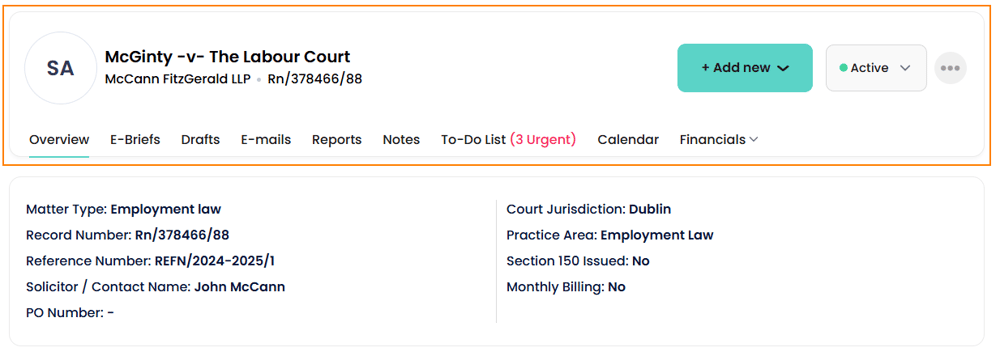
Overview Tab
The overview displays the details you added when creating the matter. You can edit these details by clicking the three dots on the right and selecting Edit.
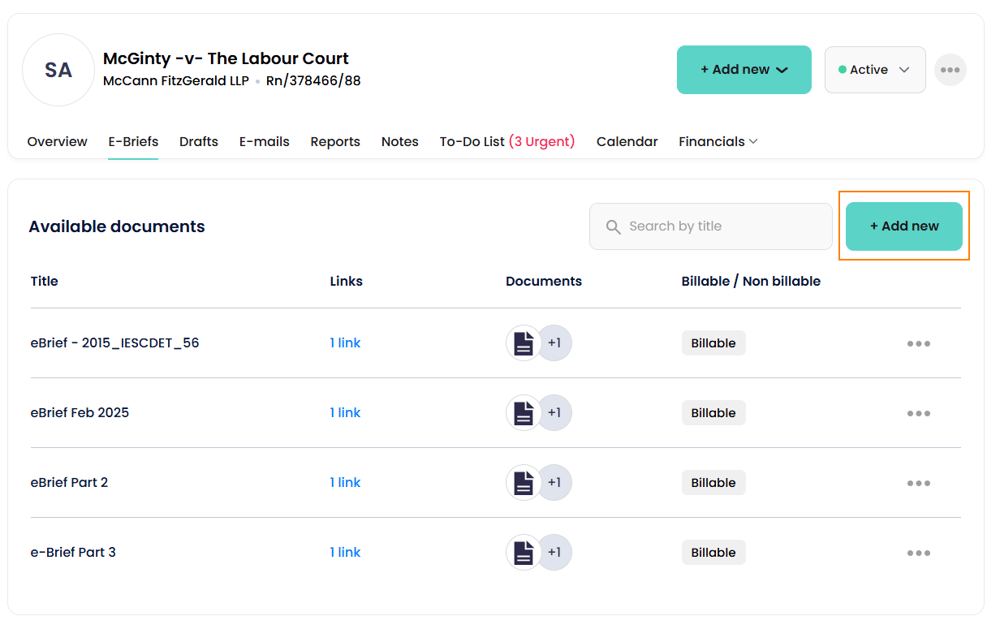
E-Briefs, Drafts, Reports & Notes Tab
In these tabs your can you upload various documents. Select the tab and click on the Add New button:
Next, add the title and description. Please note, these details will be added to your Bill of Costs at the time of creation.
You can then upload your document(s) by clicking Click to upload and selecting either a file from your computer or OneDrive.
If you wish to add a link you can paste the link into the Add links section. This is useful if you want to link matter to a online case.
Next choose if this is a billable or non billable task. If billable you can fill in the amount or leave as is. You will be able to edit this amount when creating your bill of costs.
Select Save details to complete the upload.
Email Tab
Within the Email tab you will see all emails you link to this matter. We will show you how this is done within the Email Management training section.
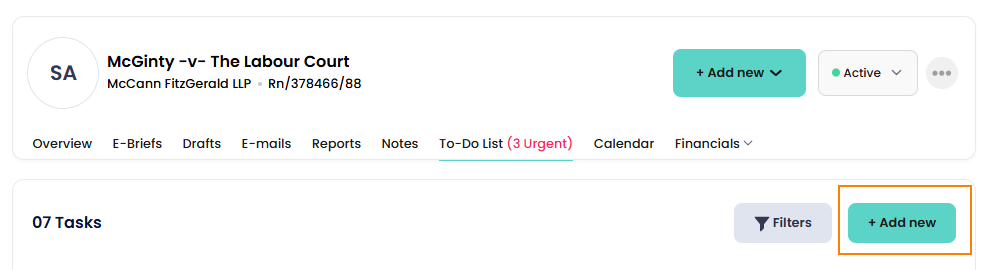
To-do List Tab
The most commonly used section within the matter is the to-do list.
Within Barrister 365 there are multiple ways to create tasks. The quickest way is to click Add New on the top toolbar and select New Task. You can also click Add new from within the To-Do list tab within the matter.
Fill in the task details, priority level, dates and if its a billable or non billable task. You can also assign your own personal tags. These are used for when filtering your task list. You can create unique tag and filter tasks by the name you give which is very handy for arranging tasks.
To filter tasks, select Filters from the task list and select the tag, priority level or date ranges. Then select Apply to view the tasks.

To reset the filter, select Reset filters.
Calendar
The calendar is were you can create and view events, meetings, court appearances and virtual hearings relating to the matter.
All calendar entries are synced with your Microsoft Outlook calendar and visa versa.
To access the calendar, you can select calendar from the main dashboard or from within any matter:

You can view the calendar in list or traditional calendar view by clicking the following buttons:
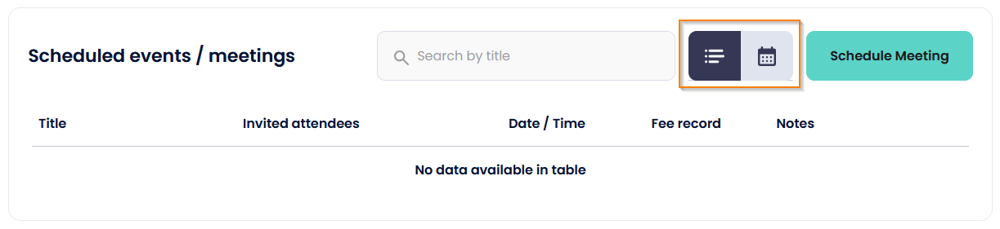
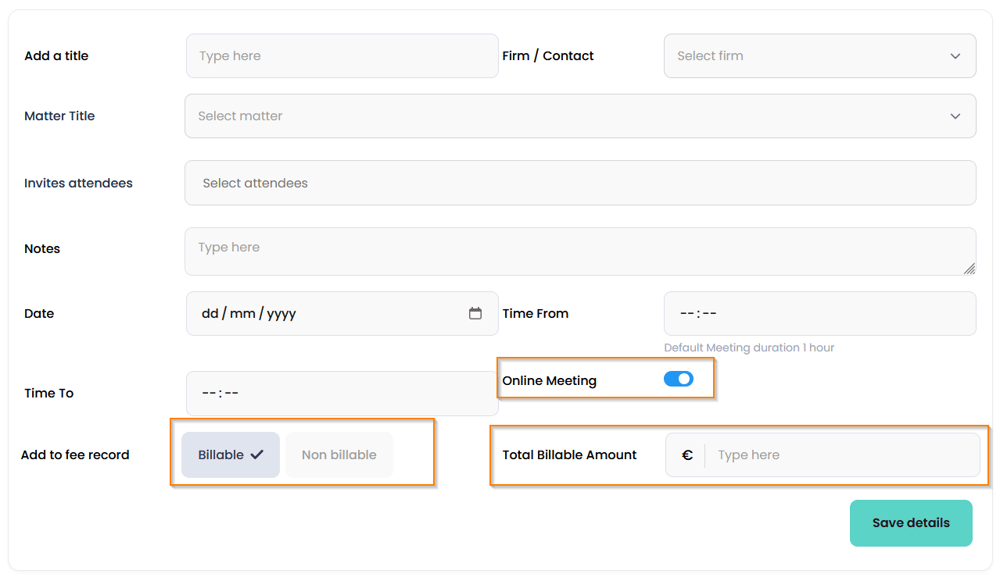
To schedule a meeting select Schedule Meeting and fill in the title, select a firm and matter title, invite attendees if required and select the date and times.
If the meeting is online toggle on the Online Meeting switch. This will create a Teams invite link for your attendees.
You can also record if this is a billable or non billable event.
Click Save details.
Next, we will create a Bill of Costs for the matter.
How to create a Bill of Costs within the matter
Select Financials within the matter and then Bill of Costs.
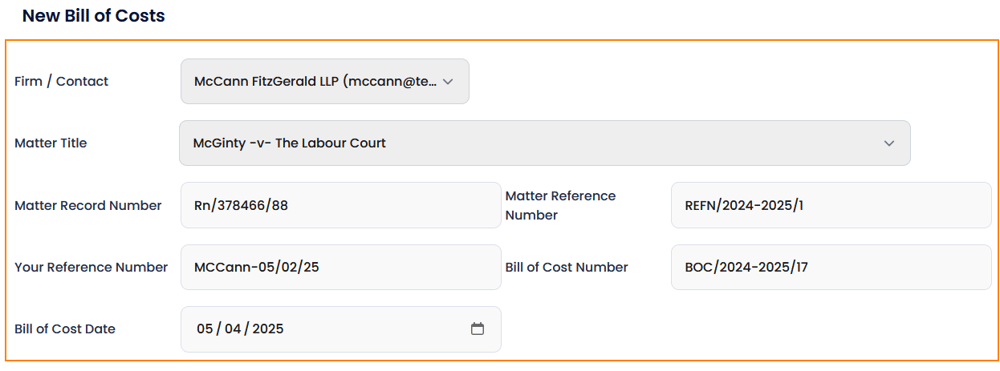
Next, click Add new.

The firm, matter title, record numbers etc. will be automatically generated for you. Please review and change these if required.
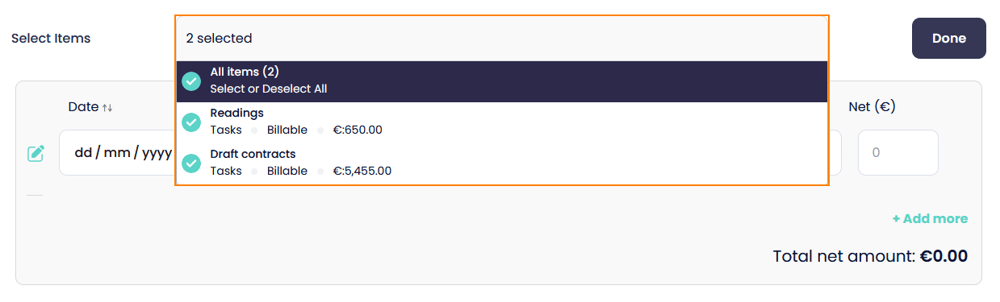
Barrister 365 gives you the option to automatically copy all work you've done on the matter directly to the Bill of Costs.
To do this, click Select items and either select All items or the individual items. Press Done for them to automatically appear on the Bill of Costs .
Now you can edit the items, descriptions and rates. You can also add additional lines by clicking Add more. To delete a line item, click the red x.
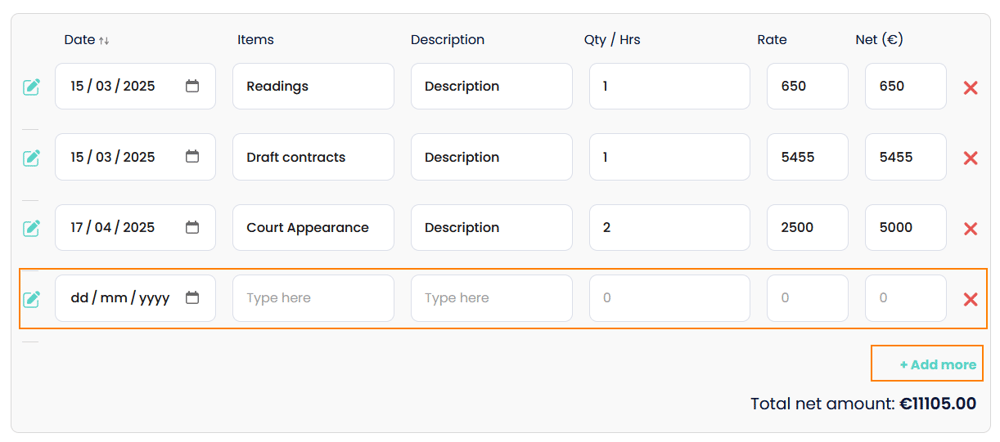
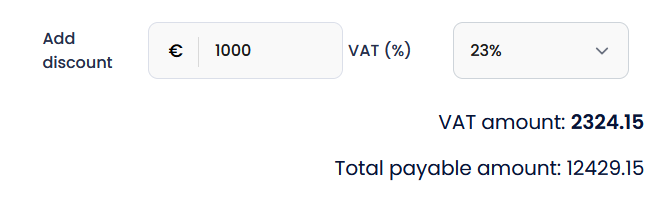
You also have the option to add a discount and change the VAT rate.
Once finished, you have the options to Save as a draft, Save & Email or Save & Print.
How to close or delete a matter
To close a matter, select Active at the top of the matter and click Closed.

To delete a matter, click the three dots to the right of Active and select Delete.
How to link an email to a matter
Barrister 365's email module is designed to help you manage your email and prevent overlooking of important messages.
You can copy emails and upload attachments to their relevant matters.
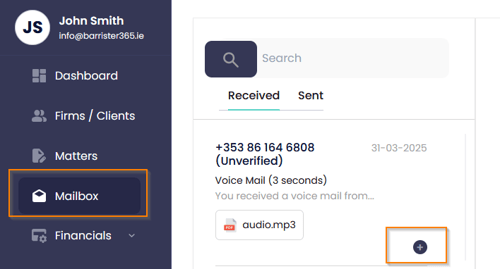
To access your emails within Barrister 365, you can click Mailbox on the left sidebar or select Mailbox from the dashboard:

To copy an email to a matter:
Press the + button on the email
Next, select the Firm, the Matter and press Copy Mail. The email will then appear within the matter under the Email tab.
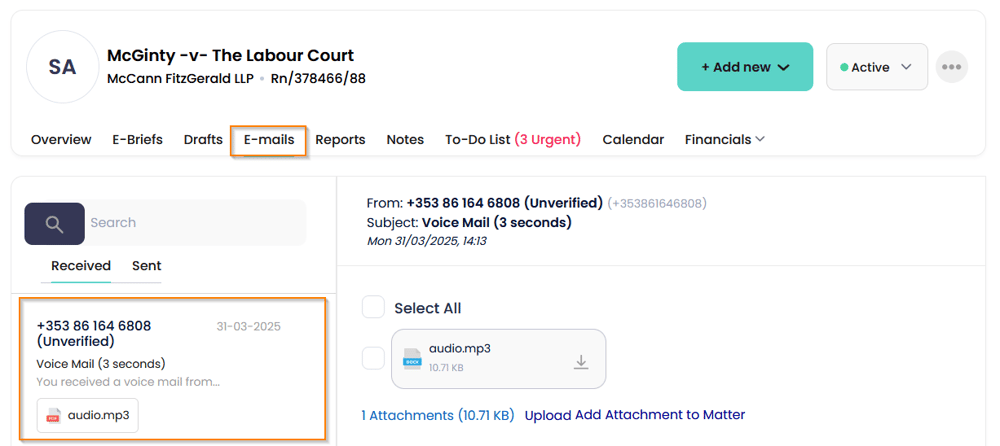
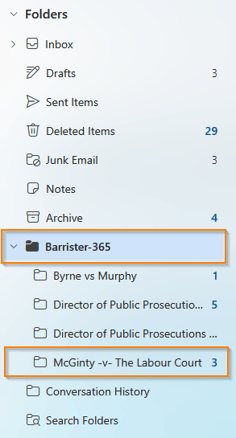
As an extra layer of organisation, when you copy and email to a matter within Barrister 365, the email is also organised in to a folder structure within your email account:
How to upload attachments to a matter
You can upload email attachments to a matter by ticking the Select All box to attach all files to a matter or tick the individual boxes.
Then click Add Attachment to Matter.

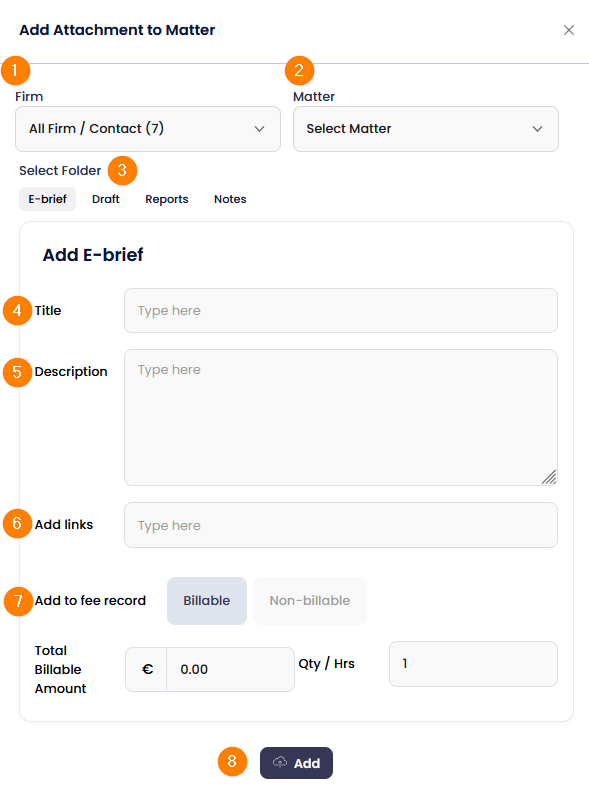
Next, fill in the details:
- Firm
- Matter
- Select the folder you'd like to upload the attachment to - E-brief, Draft, Reports or Notes.
- Title
- Description (which appears on your Bill of costs).
- Add any links
- Select if its a billable or non billable item and the amount.
- Press Add to upload the attachments.
Again, all uploaded attachments will be saved into the correct folder structure within your OneDrive.
How to send emails from Barrister 365
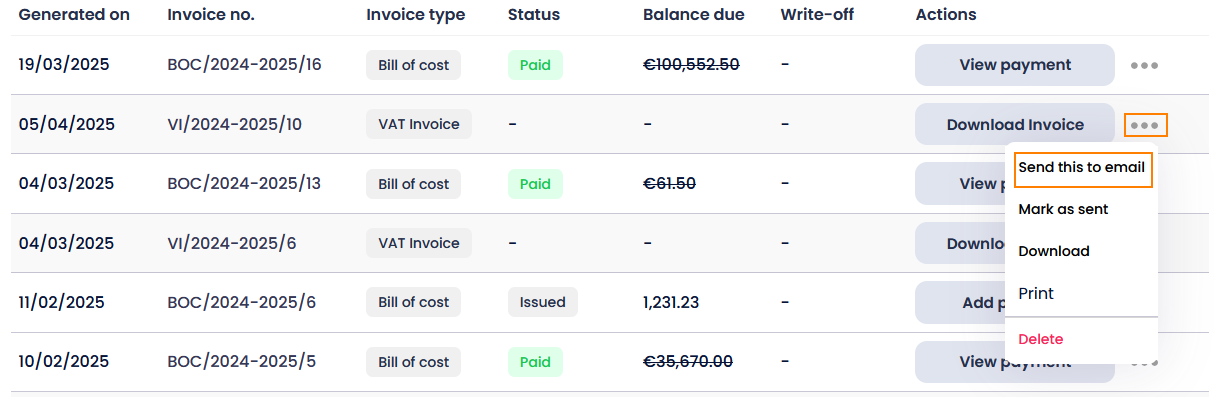
In various areas of Barrister 365 such as Bill of Costs, Expenses, Section 150's and VAT Invoices, you can email directly from within the app.
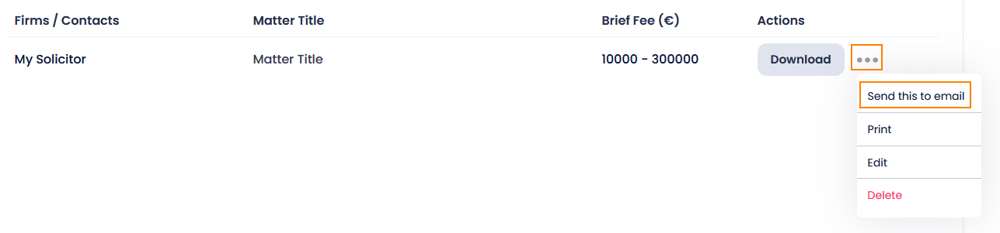
Click the three dots on the list to extend the options and select Send this to email.
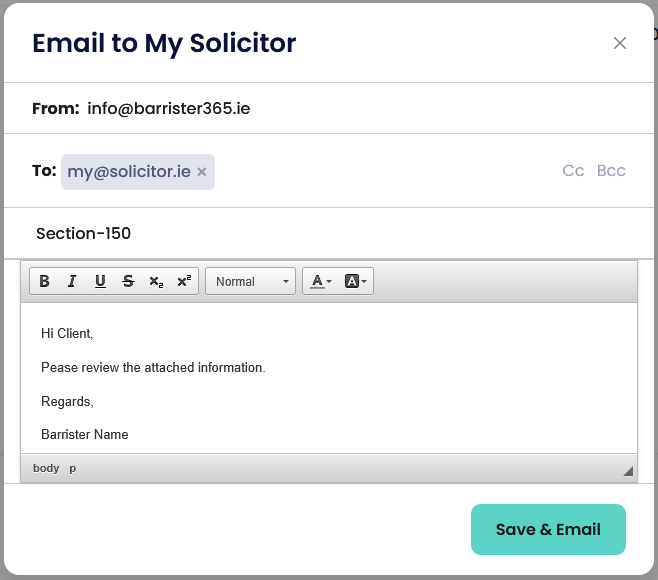
Next, fill in the recipients details including Cc and Bcc if required and text.
Press Save & Email to send.
How to create a Bill of Costs
Similar to creating a Bill of Costs from within a matter, you can also create one directly by selecting Add New on the top toolbar and clicking Bill of Costs.
Next, fill in the firm, matter title, record numbers etc. If the firm or matter do not already exist within the app, you can select add new firm from the drop-down menu.
If you've previously done work on the matter, you can automatically copy all work directly to the Bill of Costs.
To do this, click Select items and either select All items or the individual items. Press Done for them to automatically appear on the Bill of Costs .
If not, you can manually add line items by pressing the add more button.
You also have the option to add a discount and change the VAT rate.
Once finished, you have the options to Save as a draft, Save & Email or Save & Print.
How to record a payment and issue a VAT invoice
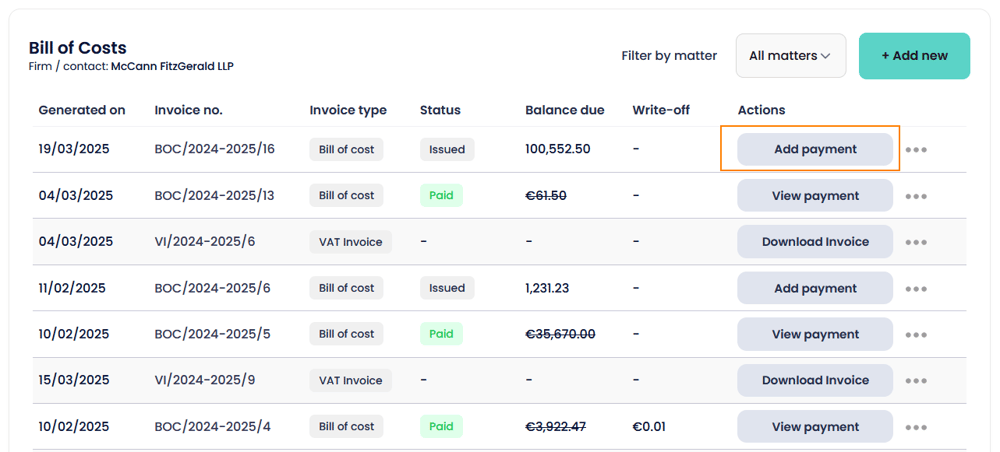
Click on Bill of Costs from the left sidebar or from within the matters under financials.
The Bill of Costs list will be displayed. Click the Add Payment button to record the payment.
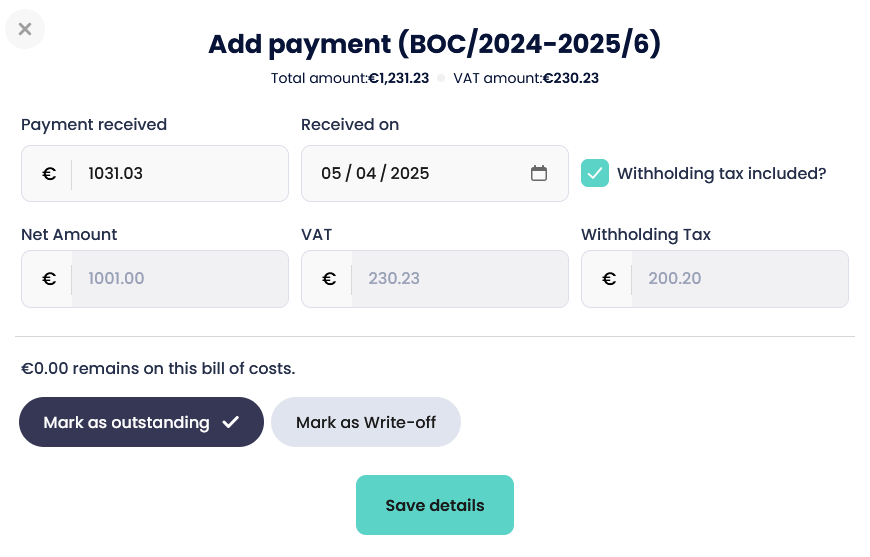
Next, type in the amount and the date the payment was received.
You can also tick the box if withholding tax is included.
If the amount received is less than the issued Bill of costs, you can mark the remaining amount as outstanding or Mark as Write-off.
Press Save details to complete the payment.
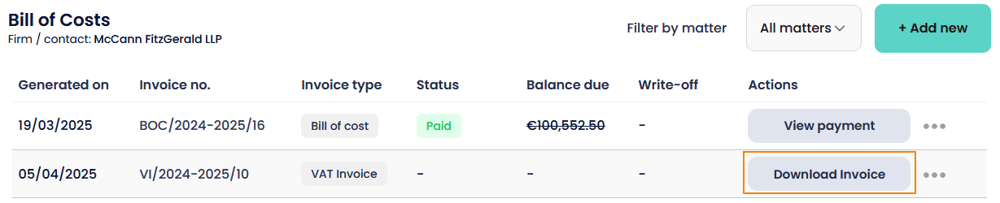
Once the payment has been added a VAT invoice will be automatically generated for the amount received.
From the Bill of Costs list, select Download Invoice.
The VAT Invoice will then download so you can email it to your client.
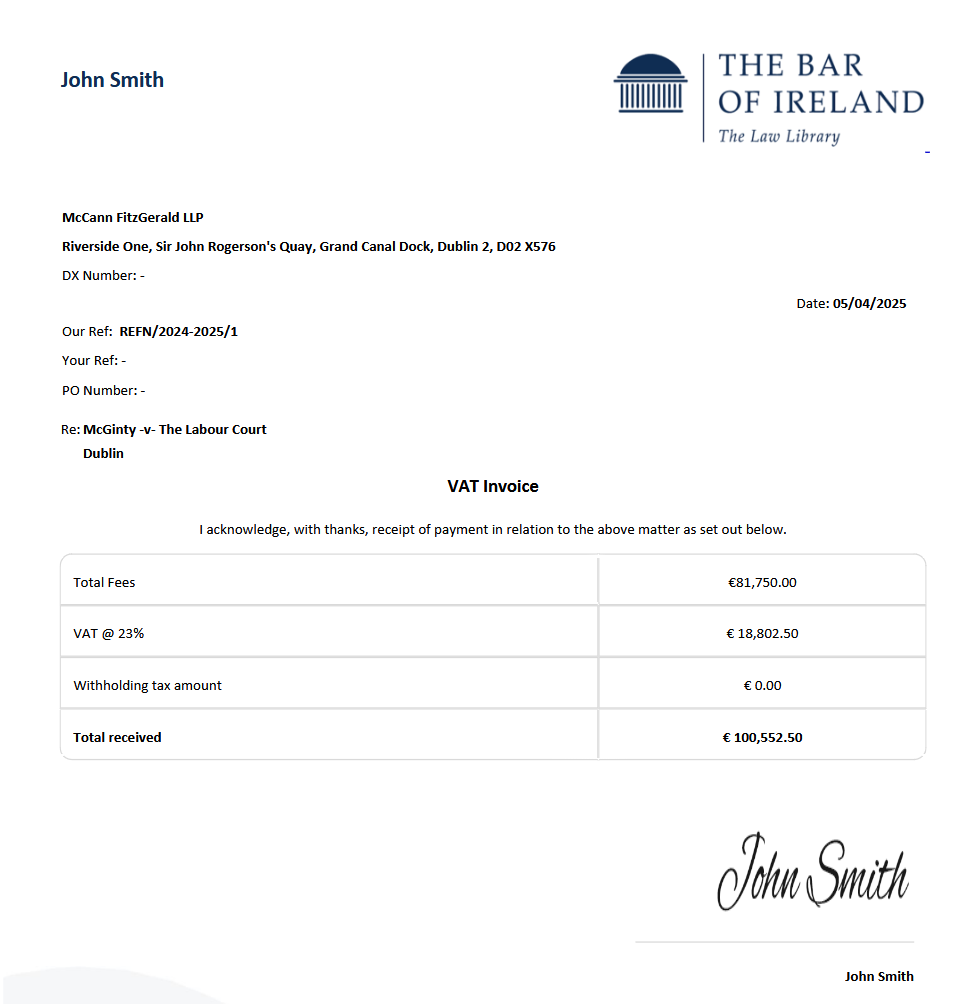
You can also send the VAT invoice directly from within Barrister 365 by selecting the three dots to the right of Download Invoice and pressing Send this to Email.
How to create a Section 150
To create a Section 150 within Barrister 365, click Add new on the top toolbar and select Section 150. You can also select Financials from the left sidebar and click Section 150.
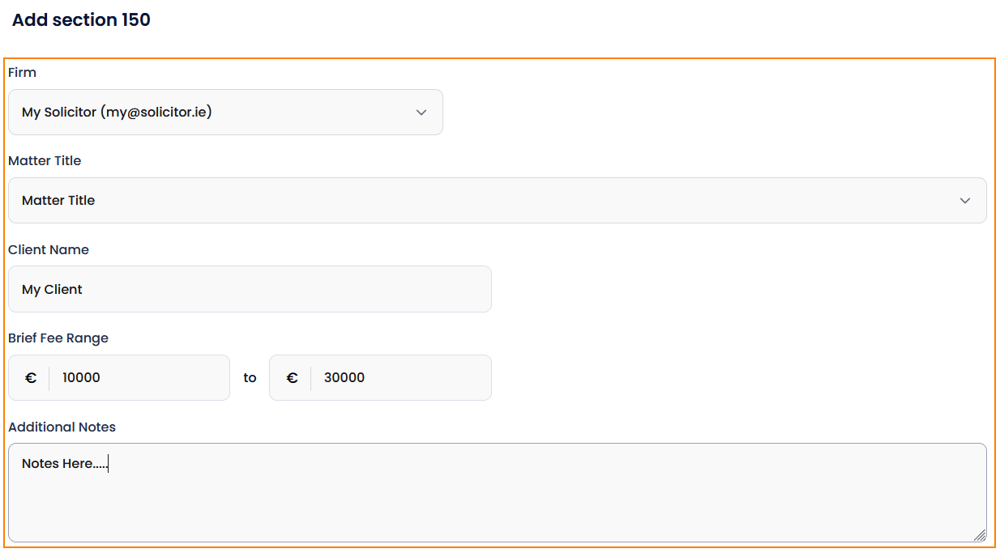
Next, click Add New and select the firm and matter title from the drop-down list.
Type in the clients name and the brief fee range. The brief fee range is not included on the section one fifty, its just to give you an indication of the fee range when viewing the Section 150 list page.
Add any additional notes for future reference.
Next, fill in the Section 150 template including dates, details and fees. Please replace the per hour with the actual rate and the number of days with the actual period before saving the details.
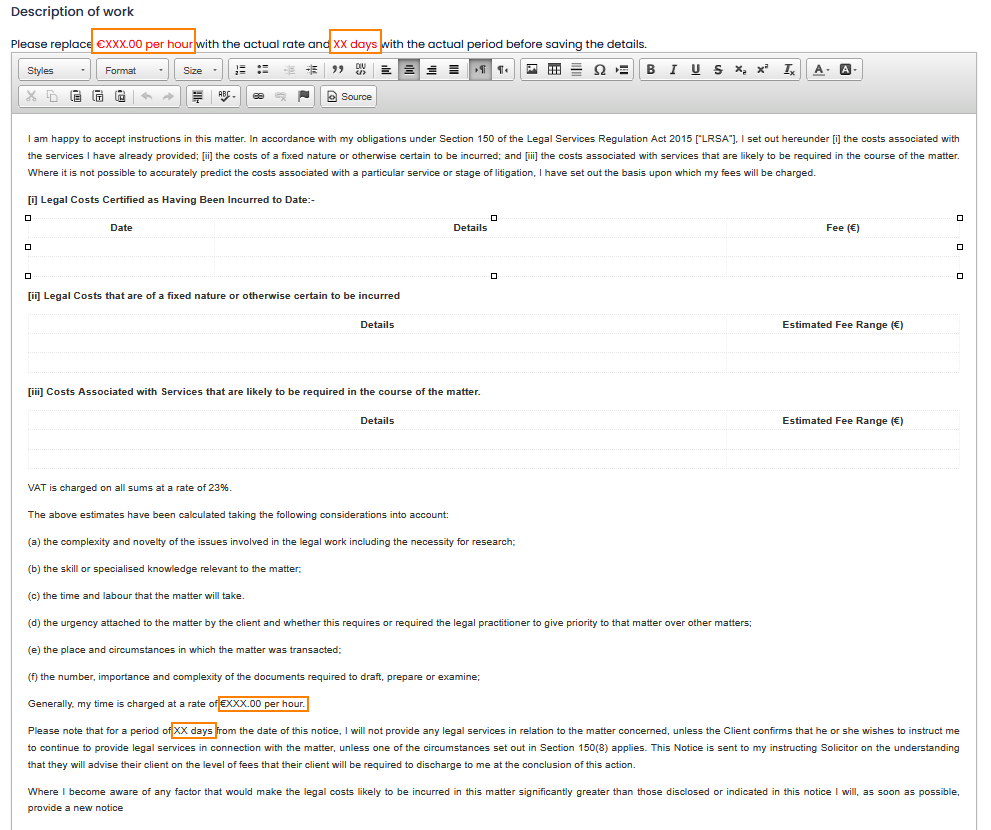
You can also use the editor toolbar to change the design, fonts and add additional information.

If you would like to import your own Section 150 document from Microsoft Word. Delete the template data and select the Paste from Word icon on the toolbar.

Next, paste your data into the box and press OK.

When you are finished, select either:
- Save details - To save the Section 150 to your Section 150 and download it to email to your client via Microsoft Outlook.
- Save and Email - To email the Section 150 directly to your client from within the app.
- Save and Print - To print the Section 150.

How to record expenses
Select Expenses from the left sidebar or select Add new on the top toolbar and press New Expense.
Next, press Add new and complete the expense details. You can upload a receipt if required.
Please note, the firm and matter details are optional.
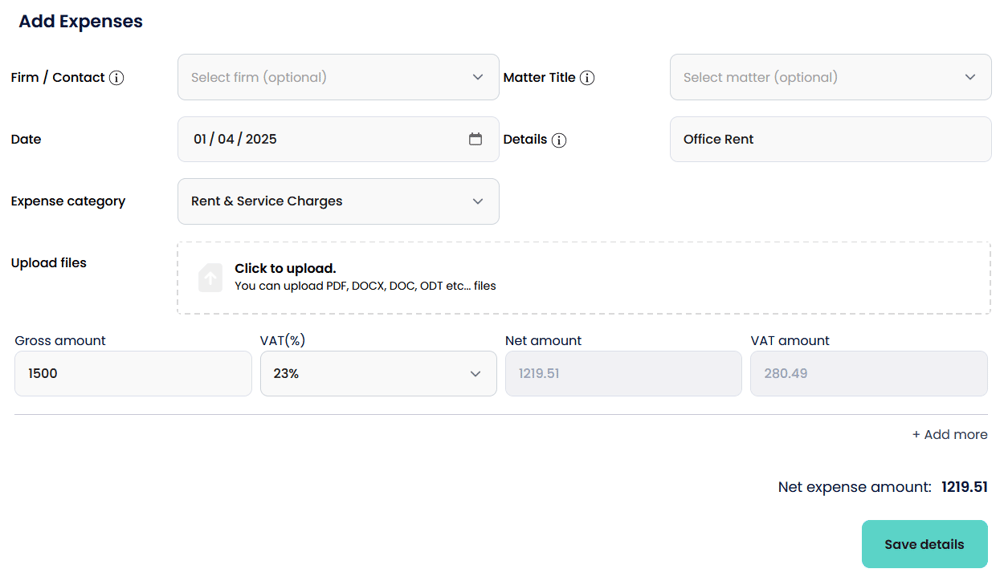
Press Save details to add the expense.
How to create an income report
Select Reports then Income Report from the left sidebar.
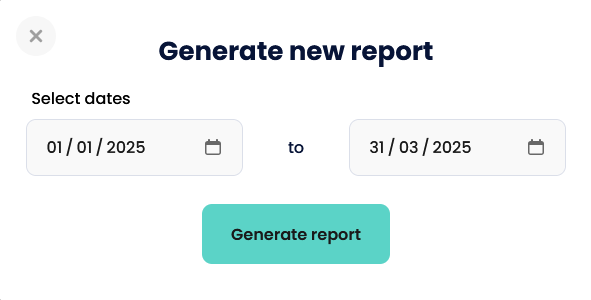
Click Generate New Report.

Next, select the dates for the report and the firm(s) for the time period.
Then select Generate Report.

The income report will then be available on the list. You can click the three dots to the right of the report to view the report. You can also export the report to PDF or Excel for your accountant.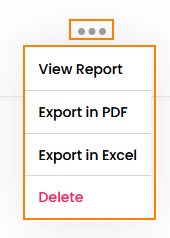
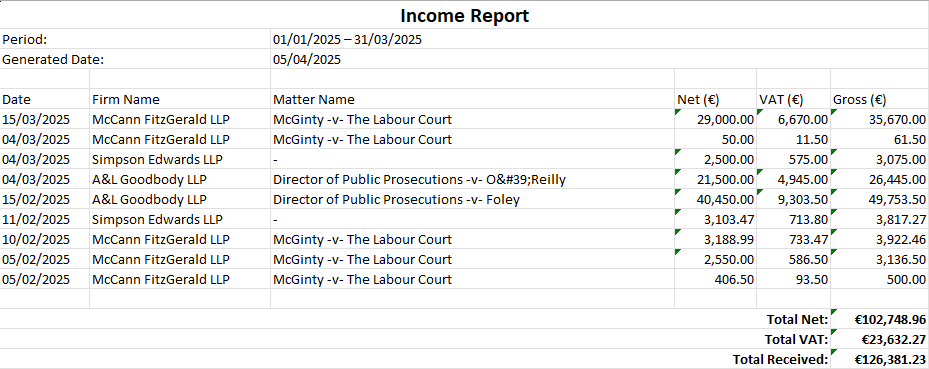
Excel example:
How to create a VAT report
Similar to the income report, select VAT Report from the left sidebar and click Generate new report.
Select the date range for the VAT report and press Generate report.
Once generated, you can click the three dots to the right of the report to view or export.
How to create a Pending due report
Select Pending due report from the left sidebar and then click Add new.
Select the firm(s), matter(s), date range and items to generate. Once ready, click Generate report.

Once generated, you can click the three dots to the right of the report to view or export.